Dog Path
Can a cheap yard project actually change dog behavior?
Original article by S. Veigel July 15, 2017
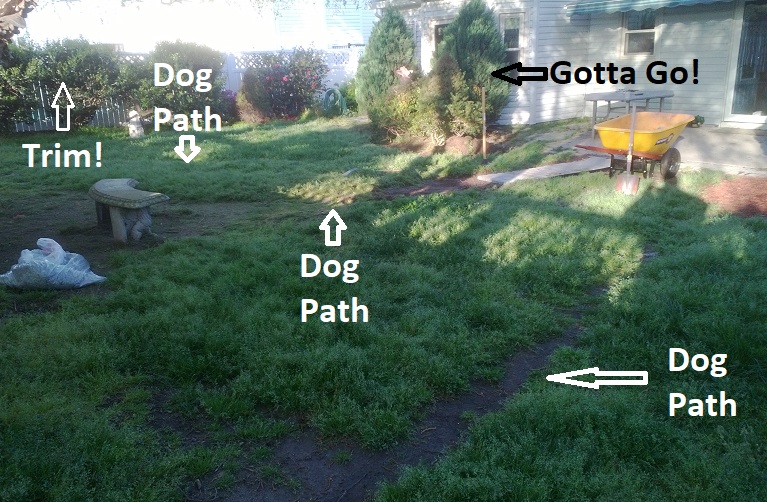
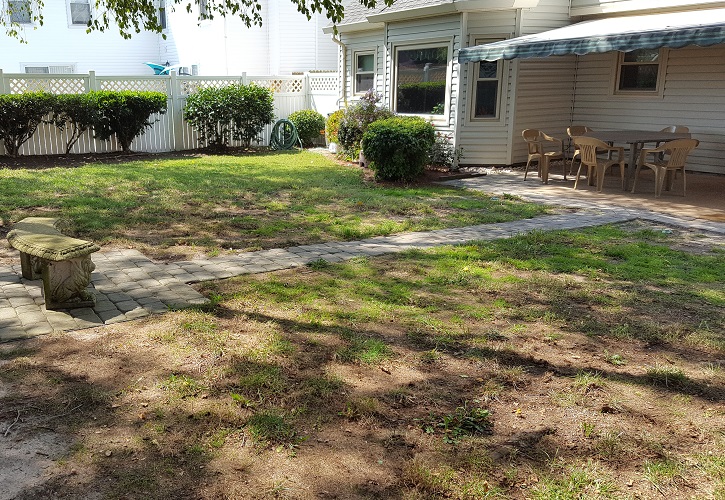
There was a time when money was so tight I didn’t even want to buy gas for my lawn mower and my yard went to crap. At the same time my dogs were wearing paths in the grass as they ran out to the fence. One path went left, one center and one off to the right. In the backyard was a concrete bench placed in front of an arbor where we were attempting to grow a vine of Jasmine. It was a nice idea but the bench was just sitting in the grass and the mud. So as I got back on my feet I told my wife that if I could put in a stone walk and sitting area there it would not only look nicer, it would also stop the dogs from wearing paths through the yard.
So this is where animal behavior comes in. Because my wife did not believe one stone walk could stop the dogs from making multiple paths through the yard. With a combination of disbelief and a chuckle of amusement she debated that I would have to put in a walk every direction the dogs ran to the fence. “No”, I insisted, “Dogs don’t want to walk in wet grass or tall grass. If given a choice animals will follow a path to avoid that”.
Well, needless to say my wife really didn’t think I knew what I was talking about but she did think it was a good idea to do something with the bench. With a little hard work and about $200 I put in a 24 ½ foot walk with “gray paver” stones leading out from the patio ending in a small sitting area around the bench. It looked really nice. But that’s not what really gratified me. What really gratified me, after my wife was convinced it wouldn’t change the dog’s behavior, was watching all 4 dogs going out to and returning from the back fence mostly by way of my new walk. Just like I said they would.
Project goal and Materials
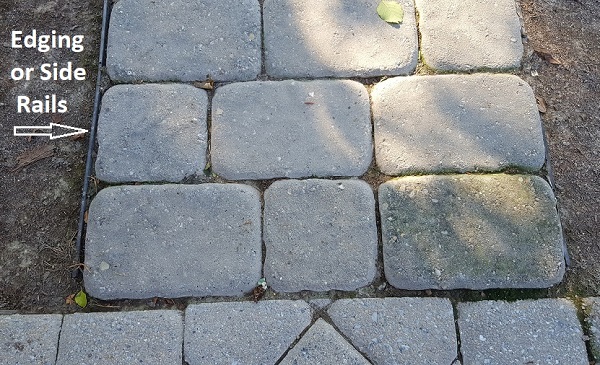
When you use something like pavers or stones it looks better if you vary the size of the stone in a seemingly random pattern. For this project I used two small square pavers (6×6 inch) and 4 long rectangular pavers (6×9 inch) for every foot of length. This gave me a nice width of 2 feet for walking.
The pattern is simple. Start with 1 square stone on the right and 2 long stones left of that. Then on the next row you put 1 long stone on the right and 1 square stone in the middle. Next row is 2 long stones on the right and 1 square stone on the left. Back to the middle with the square stone and then right. And so on just moving the square stone’s position as you go.
Stones per foot of walk length:
2 “6×6” pavers (5.8 inch x 5.8 inch actual size) Price each = $0.84 Total = $1.68
4 “6×9” pavers (5.8 inch x 8.8 inch actual size) Price each = $1.04 Total = $4.16
Total cost per foot of walk length = $5.84
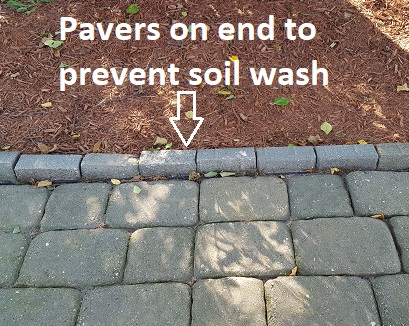
You’ll also need side rails (Paver Edging) to keep the stones in place. The side rails are held in place by hammering 8 inch spikes into the ground (About 4 or more per rail).
“Paver Edging” 2 each per 6 foot of length Price each = $7.97 Total = $15.94
“Anchoring Spikes” 1 package of 8 per 6 foot Price each = $4.97 Total = $4.97
Note: Anchoring spikes also come in a package of 16 each for about $10.97
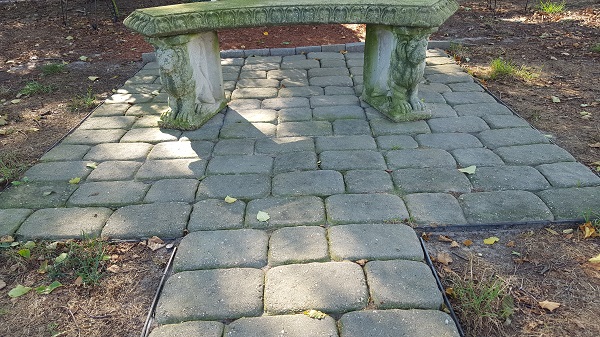
For the sitting area you don’t try to figure where the sitting area starts. You lay the walk all the way to the end of the sitting area and build out left and right of that. So for my project I used the same number of stones to the left of the walk at the end (per foot) and the right. Then all I had to figure was how many more stones per foot I’d need for the length (depth) of the sitting area.
Transporting The Stones
It’s nice if you have a big truck or if you can wait for the stones to be delivered. But I was in a hurry to finish the project and all I had was a little Pontiac Sunfire. The back of the car would seat 3 people but I knew the trunk extended beyond the wheel base and that length would multiply the weight on the rear axle. So I just figured if only 2 people, weighing 150 pounds each, were in the back seat that would be 300 pounds. So I used my smart phone calculator at the store (weights are listed on the product) to figure how many stones I could load into the trunk of the car. You could tell there was some weight in the back but it did fine. At home then I unloaded the stones into a wheel barrel, dumped the stones near my work area and made another trip to the store
Tools and Laying Out the Work Area
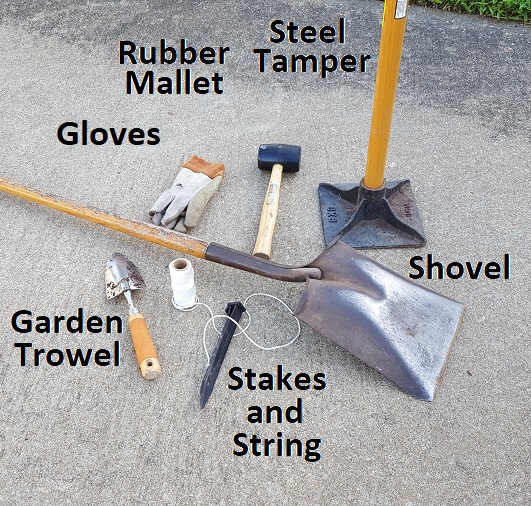
The most effort spent on this project was digging up the grass and flattening/packing the soil. To start just stick a few spikes in the ground and use string to lay out your work area. Measure at several points to make sure you’ve marked out an equal width. And remember. It’s just a guide for where you’re digging. If you’re off by a fraction of an inch it won’t matter. You can fill in dirt and plant grass as needed when you’re done.
Note: It is recommended that you dig deep enough (about 5 inches) to lay a base of “Leveling Sand” or “Gray Paver Sand” 2 inches thick for proper drainage and support for the stones. However, my backyard soil is a mix of sand and hard clay so I did not do this. I just packed it good and 6 years later nothing has moved; and no more dog paths.
After you’ve marked out your work area take a shovel and shave off the grass sod (see Best Garden Shovels). I piled the sod in one area to get rid of it and the dirt in another pile so I could just spread it around the garden. To figure how deep to dig I placed a paver stone in the dirt where I dug to see how it fit and whether it would be high enough in the ground to suit my purpose. Then I took an 8×8 inch “Steel Tamper” and pounded the soil with it to make it level and compact. Occasionally I used a long carpenters level to see if it was reasonably flat; adding some soil and tamping it down as necessary.
Remember: Even shaving the ground is defining your work area. You don’t have to dig to an exact width it just has to be wide enough for your stones and the side rails (edging) to fit.
Laying the Pavers and Edging
After you’ve shaved off the sod and packed the soil the hard work is over and you can easily reap your reward in one morning. But this is where it’s helpful and faster to have someone hand you stones from the pile. As I bought stones I piled the wide stones separate from the small square stones and I was lucky enough to have my 7 year old granddaughter excited about helping me build it. I would just say, “I need a small (square) stone” or “Big stone” and she’d hand them to me. As we moved on she knew exactly what I’d need and usually had two in her hands ready to go. Turned out to be a great way to spend time with her and let her see how things were done.
Starting from the patio I’d butt up the first row against it to start a straight line. Then I’d use a rubber mallet to tap the stones up against each other and align the edges. Before you knew it we were finished. But now we had to do the side rails to keep it all in place.
Installing the 6 Foot Side Rails (Paver Edging)
I suppose I could have done some impressive math to figure out how deep to dig for the side rails (paver edging) and how far apart at the beginning, but I’m not that complicated. I just knew I didn’t want them to stick up above the stones while they were still high enough to keep the stones in place. So I took a rail and dug a little trench along the stones with a garden trowel until the rail sat at the right height (just below the top edge of the stones). Then I drove 4 spikes into the dirt to hold the rail in place while I moved on to the next section. Around the sitting area I just laid a rail along each side to mark its length and cut it with a hack saw. When I was finished I took some extra spike packages and drove a few more spikes into each section just for good measure.
And that was it! One decorative sturdy dog path ready to go! And the feel of that solid walk under your feet, instead of mud and grass, as you walk out to the bench is better than you might think. Six years later the dogs still use it and my granddaughter smiles with pride when I say, “We did that”.